

The original post about the inspiration for this baby quilt design can be found here. I have also added a Elephant Parade quilt along page that includes all the information you will need and a weekly schedule. As each post is published the live links will be added to the schedule. The Elephant Parade page tab is found just below the blog header.

Happily, Northcott Fabrics is as excited to see this come to life as I am, and will be sponsoring this project. Follow along and watch as these bright solids from their ColorWorks Premium Solids quilting cottons collection become shaped into these adorable animals!
It is not necessary to purchase the pattern in order to participate. But if you are wanting to make the complete quilt, as pictured above, and would prefer the convenience of using a printable pdf pattern, Elephant Parade is available for purchase and includes complete cutting instructions and a detailed guide to finishing the entire quilt. The pattern is available in my pattern store here.
Now that you have completed your quilt top and made your backing...
IT'S QUILTING TIME!

For the quilting on my Elephant Parade quilt, I referred to my recent post on Quilting With Your Walking Foot. It was a toss up. I had considered using the organic wavy lines for quilting. And I also thought about using a different decorative stitch found on my machine. I personally prefer a quick finish using an edge to edge design. For this quilt, I used the Serpentine stitch.
I am so excited to share a few finishes made by some of the participants. This may help you get some ideas for how to quilt your completed top. Click on the photo or the link to their blogs for more details.
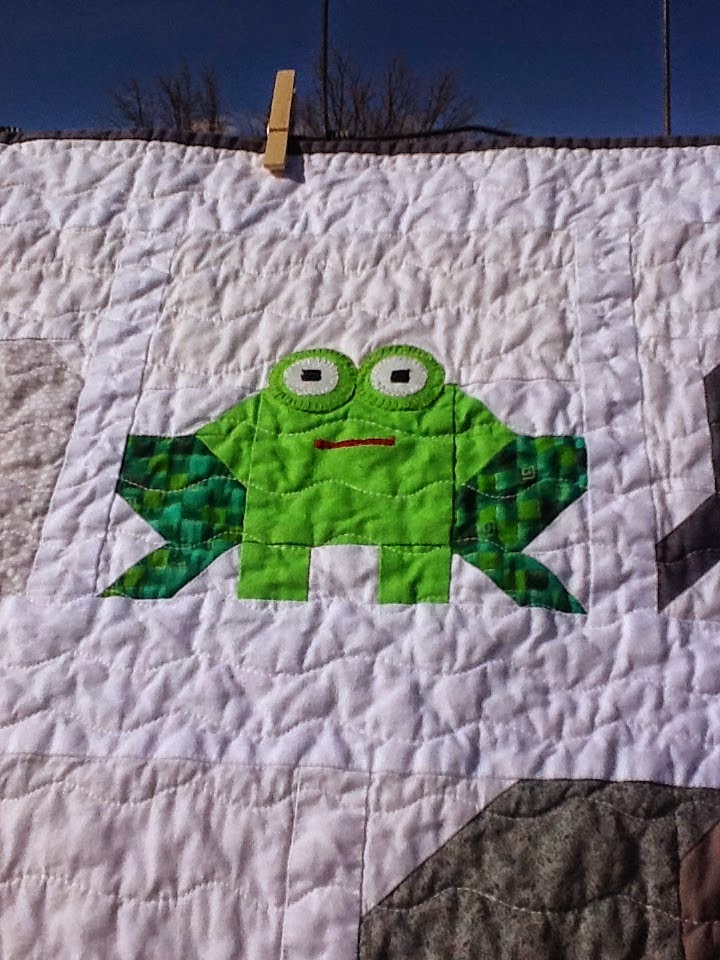
This cute froggy finish is by Tanya of Tanya Quilts in CO.
She also used the Serpentine stitch and you can see how lovely it looks fresh out of the wash, hanging on her clothesline! Crinkly, quilty goodness there!!!
Marlies used her imagination and made a really cute table runner. You just have to pop over and see the little yellow butterfly block she added to her parade! She also used the Serpentine stitch. Marlies blogs over at G'macht in Oberbayern.

Here we have a sweet pink finish by Carol of Just Let Me Quilt.
She added a double ruffle and some organic wavy lines to quilt it. Doesn't that ruffle add just the right touch for making it so girly? Sure does dress it up nicely!!!

How about this smooth finish by Kris of Kris Loves Fabric?
She quilted in organic straight lines from edge to edge. This quilting style reminds her of the lined school paper that she used to draw Ed Eberley animals on as a kid.

If you are more of a free motion quilter, perhaps you would like to outline the elephants and other characters and then do a swirly thing in the background. I know there are a lot of free motion quilters out there who could make this quilt shine with their talents!
Here is a clever example by Maartje of Maartje Quilt in Amsterdam.
She used her imagination and came up with a free motion design that includes loops and elephant feet. And she shares a tutorial for this motif on her blog!
Thank you for sharing, Maartje!!!

Another example of finishing using a free motion quilting motif, is this swirly loopy quilting design performed by Yvonne of Quilting Jetgirl. Love it!

I am looking forward to seeing all the different examples of how everyone chooses to quilt their own Elephant Parade quilts, runners or pillows!
On the Elephant Parade page, the cutting instructions state to cut 5 strips for binding. I decided to shake things up a bit and opted to add little bits of the solids used in the quilt between each of my binding strips. I called this method Little Bit Binding and included it in my Mastering Machine Binding post here.
To make the Little Bit Binding, make your binding strips as usual. Also cut the same number of "little bits" from contrasting fabrics. Please note that in the diagram below, I have made my "little bits" measuring 2.25" x 3.5". The "little bits" each measure the same width of the binding strips and are 3.5" long. If you use 2.5" wide binding, cut your "little bits" 2.5" x 3.5"
For my Elephant Parade quilt, I choose same fabrics used in the quilt top to make my little bits.
Step 1: Take your first little bit and your first full length binding strip.
Step 2: Draw a diagonal line, as shown in purple, and sew to make a miter join.
Step 3: Using your acrylic ruler and rotary cutter, trim a 1/4" seam.
Step 4: Press the seam open and arrange your next little bit to be joined to the other end of that first strip.
Step 5: Draw a diagonal seam line, as shown in purple, and sew to make a miter join.
Step 6: Using your acrylic ruler and rotary cutter, trim a 1/4" seam.
Step 7: Press the seam open.
Step 8: Arrange your next full binding strip to be joined, draw a diagonal seam line, as shown in purple, and sew to make a miter join. Use your acrylic ruler and rotary cutter to trim a 1/4" seam.
Step 9: Press the seam open. Arrange your next little bit to be joined, draw a diagonal seam line, as shown in purple, and sew to make a miter join. Use your acrylic ruler and rotary cutter to trim a 1/4" seam.
Step 10: Press the seam open. Continue alternating your remaining full length binding strips and little bits.

When
you have joined all your little bits and long binding strips together,
press with wrong sides together along the entire length of the binding.
When you are ready to apply the binding to your finished quilt, begin
using the end that has a little bit on it. When you come to the end and
are ready to join the tails of your binding, lay the last long binding
strip, overlapping the beginning "little bit" 2.25", and trim the long
binding strip.
I can hardly wait to see all your finished projects!
Please do check in next week to join the linky party!!!!!
Even if you don't have a finish to share yet, it will be fun to see what everyone else has to share. And the linky party will be NEVER ENDING. So you can link up whenever you are finished!
Join the Elephant Parade!

A quilt along button has been added to the right sidebar. If you are
interested in quilting along, please add the button to your blog and
help to spread the word. It's never to late to join in and quilt along!
Please feel free to share via social media! And add the hashtag #elephantparadeqal
I have also added a page tab Elephant Parade
under the blog header. Here you will find all the details of the quilt
along and a schedule.
Join us next week for the....
Never Ending Show Us Your Elephant Parade Linky Party!
Keep On Quilting On!


To follow Sew Fresh Quilts by email....


7 comments:
What a great idea to show so many quilting variations in one post! They are all lovely but it's especially nice to see how each changes the look of the quilt. Congratulations on so many "grandkids"!
This quilt design can't help but make us smile...loved it! Thanks for sharing my quilt and all the other beautiful ones quilted!
Lots of Quilty Inspiration in this Post! It certainly has my wheels turning!
Love every one of them too! You must be pretty thrilled Lorna to see your quilt design take so many shapes and colors! What Fun!
Beautiful examples of quilting that can be done on this quilt. Great post. Thanks.
Thanks for including mine with all these beautiful finishes. And thank you for such a fun QAL, just a really nice way to wait winter out this year :)
These are all so cute! I finished my people yesterday, so I just have to make the giraffe, monkey and leopard before I can start putting them together. Hmm, and maybe a butterfly! I love that you aren't rushing us, but are providing motivation and incentive to keep going and get this quilt put together. Thank you for that!
Hi Lorna,
want to thank you for this fun we have had with the elephants ect.
My top ist finished (picture in my blog) now I want to quilt, but I still don't know how.
Great samles in this post, they all looks great!
Liebe Grüsse
Bente
Post a Comment