As I said last week....
In real estate they say, "Location, location, location!"
In quilting we should always first consider, "Layout, layout, layout!"
Other than fabric selection, the first thing you should take a look at is how you want your blocks to be displayed. Square or On Point? With sashing or without?
Today I will cover some ideas for....
- fabric selection,
- show examples of possible layouts,
- and methods for making Granny Squares according to the layout options.
For this portion of the tutorial, I will briefly discuss fabric selection and show examples of possible layouts.
Part 2 of this tutorial, showing the methods for making Granny Squares, can be found linked here.
FABRIC SELECTIONS:
What a crazy square that granny is. The individual patches in the block are traditionally displayed as though on point. However the individual blocks they make are squared.
The traditional Granny Square block is made using a three colour combination of rings plus a background fabric. Additional rings can be added. A four colour combination block has been known to be called the Great Granny Square.
Most Granny Squares are made using high contrasting choices to highlight the rings and center square. This granny has a black center square, a blue inner ring, and an orange outer ring.
LAYOUT OPTIONS:
Your method of making the Granny Squares will depend on the layout you choose. If you are planning a layout that includes sashing, making traditional blocks makes sense. But, as I learned, if you do not wish to use sashing, making traditional blocks is not the best or easiest way.
The following are some examples of layout options.
All of these photos were used with permission and links are provided to the quilt makers' blogs.
I encourage you to visit using the links and read about each of these quilts.
Please, if you would like to pin, pin from the blog owner's page.
With Sashing:
This quilt, made by Melissa of Missouri Mel, was made using 1930's prints in an aqua and orange palette. Melissa explains in her post, that using the sashing helped to aid in the squaring of the blocks.

With Sashing and Cornerstones:
Mary of The Tulip Patch, created this quilt using a black text print to make cornerstones between the sashing. Her granny squares also include an additional outer row of blocks, each block using a four colour combination. And I love the addition of her signature Scottie block.

Without Sashing:
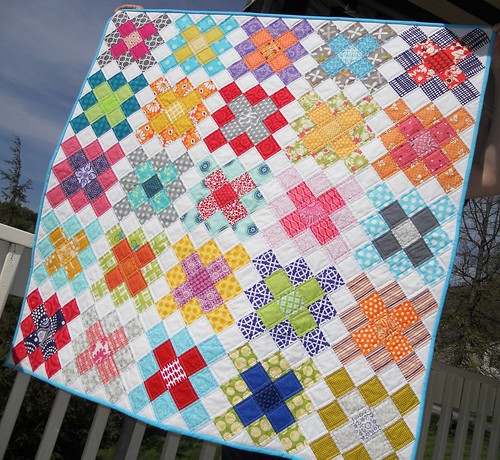
This quilt by Jessica of Sew Crafty Jess, is made without sashing. But SHE was thinking ahead. This quilt is not made using blocks.

Without Sashing:
Great Granny quilt, made using solids and a gray background, by Rachel of Farm Gal Designs.

Another way to layout the granny squares would be to put them on point.
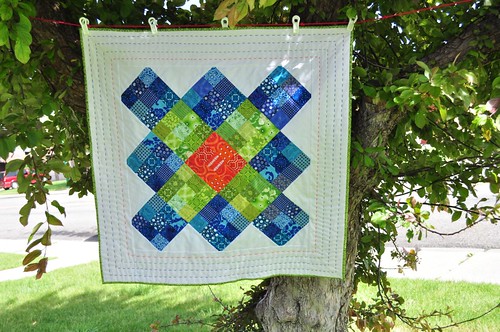
An interesting variation is this scrappy Giant Granny Square by Diane {from Blank Pages.

So, as you can see, there is more than one way to use that old granny square!
Please do check out Part 2 of this tutorial here.
Keep On Quilting On!
Please do check out Part 2 of this tutorial here.
Keep On Quilting On!
Don't miss another post!
Sign up to follow by email...


thanks for sharing the photo. nice to see the different layouts all together.
ReplyDeleteWhat a lot of options out of one block! Thanks for sharing it through pictures!
ReplyDeleteGreat work Lorna and I really like the last one! Thanks for sharing.
ReplyDeleteFreemotion by the River Linky Party Tuesday
It's amazing how different the same block can look when it's laid out differently! I'm pinning these for later. Thanks!
ReplyDeleteWho would have thunk it? Thank you so much for the insight into the popular 'granny square'!
ReplyDeleteThanks for the tutorial, and the sound advice to think the process right the way through before you start.
ReplyDeleteReally good info about the layout options. Thanks for taking time to research & post the suggestions!
ReplyDeleteThose are lovely!
ReplyDeleteI did not know all this. Great tutorial. Sure is a good variety of choices!
ReplyDeleteThanks Lorna,I really love the one without any sashing! Something to keep in mind...
ReplyDeleteThey all look lovely! Granny squares is a project I want to do at some point but boy, you have certainly made me think about layout!! It is amazing how different they all look.
ReplyDeleteVery cool. I think my fav is the scottie dog granny...such personality! Great design choices make the humble granny into a superstar! Thanks for walking us through some of them today.
ReplyDeleteWOW. Great tutorial. Loads of information and so clearly explained. It was worth the (very short) wait.
ReplyDeleteI like seeing the different quilts. Great idea not to make blocks. Seems like it would be faster with larger pieces.
ReplyDeleteWow...so many possiblities with just a change of color!
ReplyDeleteThank you for this nice post, it explained a lot of things I had been wondering about.
ReplyDeleteGreat collection of granny square blocks. I have made two, but these make me want to make another one :)
ReplyDeleteI am in awe of your fantastic talent in use of color, values, and style in you quilting! Thank you for sharing so graciously in you blog and web site. You are appreciated.
ReplyDeleteI have yet to make a quilt, but now you have given me so many more choices - I do not know where to start! Up until tonight I thought I did know where to start but now - so many choices!